Showing posts with label methods. Show all posts

Thursday, June 28, 2012

Using Light Traps to Catch Insects

A simple insect light trap can be
constructed using these four components.
Photo by Brad Sylvester, copyright 2012
Up until now, for the most part, I have been simply recording the creatures that live in my yard as I find them, one by one. Sometimes, I go out looking for them, and I did use small insect pit traps to collect a couple samples. There's another way, however, to find some creatures that I would otherwise not be able to locate and to collect much larger numbers of species all at once.

What is a Light Trap?

That method involves using light traps. Light traps rely on the fact that many nocturnal insects are strongly attracted to light. By setting up lights to shine on white surfaces, we can induce large numbers of such insects to land on those surfaces. If the surface is slick and slanted sharply, many of them will fall to it's base where a collection bin of some kind can hold them until they can be gathered and examined. The sooner they can be collected, the better.

Many entomologists will line the bottom of the collection bin with poison that kills the collected insects quickly, before the specimens can be damaged by each other, or by struggling to escape. I'm not going to do that. Instead, I'll try to use a collection bin that minimizes such damage. One of the difficulties with live collection bins is catching live insects from the collection bin, without them either escaping once it is opened, or damaged by the collector when they are removed.

Limitations of Light Traps

These kinds of traps can not and will not catch every insect that hits the illuminated collection surface, and certainly not every species of insect in a given area. Some, if not most, will either rebound off the surface and miss the collection bin, or take flight again without falling into the bin. Some will be able to land on the collection surface and remain there due to their adhesion to smooth surfaces being stronger than gravity. Many other insects are not attracted to light at all and will be found in a light trap only by rare coincidence, if at all.

So, the absence of any particular species in a light trap does not mean it isn't there, just that it wasn't caught. Light traps do, however, provide a means of large scale species sampling of a location, and in some cases, can capture hundreds of species of insects in a single night.

The species that are caught by any given light trap will depend upon where it is placed. One placed in an open field, for example, will catch different species than one just 50 yards away in a thicket. There will, generally, be some overlapping species, but many will only be found in one habitat or the other.

I'm going to start with one light trap, placed in the woods. My time and ability to process large numbers of insects for this blog are limited, so I'll use a smaller light collection surface, and I may turn the lights out fairly early in the evening if the trap has accumulated a significant number of species. In any case, I'll post again tomorrow with an overview of the results and then I'll begin adding new species pages as quickly as I can.

How to Build a Simple Light Trap

Equipment:
1 collection sheet (A flexible sheet of white material, smooth plastic works best.)
1 collection bin, (may be almost anything with smooth vertical walls, a jar, for example)
duct tape
1 light source (This may be turned on for hours so use rechargeable batteries or an approved outdoor extension cord)

Figure 1: A small hole leads into the collection
bin. The hole is at least several inches above
the bottom of the collection bin.
Photo by Brad Sylvester, copyright 2012
Step 1:
Curl the plastic so that it forms a small opening inside the collection bin, and the sides conform to the shape of the collection bin. Use a piece of duct tape to hold the collection sheet together, as shown in figure 1.

Step 2:
Use duct tape to pull the plastic collection sheet tight ot the edges of the collection bin so that no openings remain except the one inside the curled collection sheet.

Step 3:
Figure 3: Simple, home-made light
trap for catching insects at night.
Photo by Brad Sylvester,
copyright 2012
Lean the back edge of the collection sheet against a tree or other support, so that it will not fall down in the wind. Place the flashlight so that it shines onto the fron of the collection sheet as shown in figure 2.

Collecting Insects with the Light Trap

Once the collection bin has many insects inside, you can shake the collection sheet to drop any insects still haning on into the collection bin. Then, remove the collection sheet and quickly cover the collection bin.

Converting the Light Trap Collection Bin into a Killing Jar

The collection bin will have a number of insects of unknown species. If you are unsure of the safety of handling the inssects you have caught, or have any allergies to stings or bites, you may wish to convert the collection bin into a killing jar so that the insects are dead before you attempt to handle them. This can be accomplished by using tweezers to dip a cotton ball into nail polish remover and then placing the cotton ball inside a smaller container inside the collection bin. Cover the collection jar or bin immediately.

Depending upon the size of your collection bin, you may need to use several nail polish soaked cotton balls to achieve a concentration of fumes sufficient to kill the insect inside. Allow several minutes for the fumes to take effect. Be sure to avoid inhaling the fumes yourself and follow all safety warnings from the manufacturer of the nail polish remover.

Saturday, November 19, 2011

Gray Squirrel (Sciurus carolinensis): Trailcam Fail

The bushy tail in the center of the bottom edge of this trialcam
photo is enough to identify this animal as a
gray squirrel.
Photo by Brad Sylvester, copyright 2011. Do not copy.
In my last post, I talked about setting up my trailcam to try to catch some photos of what I presumed would be a squirrel that had left some telltale signs at the base of a tree. I worried that the trigger time of the camera would be too slow to catch a fast-moving squirrel as it scooted up and down a tree trunk. It appears that I was correct to worry. Although the trailcam captured 20 very nice pictures of a tree trunk, it appears to have captured only one single picture of a bushy tail at the lower edge of the frame.

Fortunately, this is enough to make a positive identification of the pine seed eating visitor as a Gray Squirrel (Scuirus carolinensis), also known as the Eastern Gray Squirrel. I was also able to catch some pictures of a gray squirrel in my yard with my regular camera during the daytime so that we can compare the tail captured by the trailcam with a known gray squirrel. I can't tell whether this is the same gray squirrel in both locations, about fifty yards apart.

Although naturally skittish, gray squirrels may
become acclimated to human presence by regular
feeding. This is generally a bad idea as they often
become quite inistent and may become pests.
Photo by Brad Sylvester, copyright 2011. Do not copy.
Unlike many animals, gray squirrels don't tend to be particularly territorial over their feeding range, especially outside of breeding season. During breeding season, they'll defend their nesting locations from other squirrels fiercely with loud, aggressive vocalization and physical attacks, driving intruders away and chasing them until they are far enough away to pose no threat.

Even during this time, however, they will eat side by side near a bird feeder or other source of food without too much issue, it is only the home base that seems to instill territoriality instincts in the gray squirrel. This shouldn't be mistaken for the courtship chases as the male often chases the female through the branches of trees as well. Gray squirrels are opportunistic breeders and don't form mated pairs.

The gray squirrel gets its name from its color as you would expect. It is predominantly gray, but has some brown or reddish patches, commonly on top of its back, on its face, and on its legs or feet. Despite these reddish markings, it is quite different in appearance than the red squirrel which is predominantly reddish in color, almost fox-red, and which is much smaller than the gray squirrel.

The gray squirrel is the largest of the eastern tree squirrels and adults are typically 1-1.5 lbs in weight and about 20 inches long, half that length comprised of the tail. In New Hampshire (and many other states), gray squirrels are considered a game animal and may be hunted in season (September 1st- December 31st in New Hampshire). In this state, hunters are permitted to take as many as 5 gray squirrels each day as per information published on the NH Fish & Game website. Despite this, gray squirrels are abundant and thriving throughout New England.

Gray Squirrel looking for dropped birdseed under a feeder.
The brownish-red patch on its back is visible here.
Photo by Brad Sylvester, copyright 2011. Do not copy.
Gray squirrels have adapted well to a suburban lifestyle, raiding gardens and bird feeders at every oipportunity. Gray squirrels will tend to store their food for the lean winter months by caching or hiding it away. They are known as scatter cachers because they make many hundreds or thousands of food stores rather than storing it all in one central location. They'll bury acorns and other seeds all thoughout the spring, summer, and early fall or place them in tree cavities for retrieval when the snow is deep. When winter arrives, they'll seek out these hidden stores and eat them, but they don't find all that they've hidden making them a prolific planter of new forest trees. It's not clear whether they remember the locations as well as the Clark's Nutcracker, a scatter caching bird that is well known for its ouistanding spatial memory, or if they just go back to areas where they found food during the summer and then sniff our buried seeds.

Gray squirrels are quite fond of acorns and, as previously mentioned, pine seeds, but they will eat many varieties of seeds, nuts, and fruit as well as insects and defenseless animals such as baby birds. In New England maple seeds are plentiful and are also a part of the diet of the gray squirrel. They'll raid gardens from time to time as well.

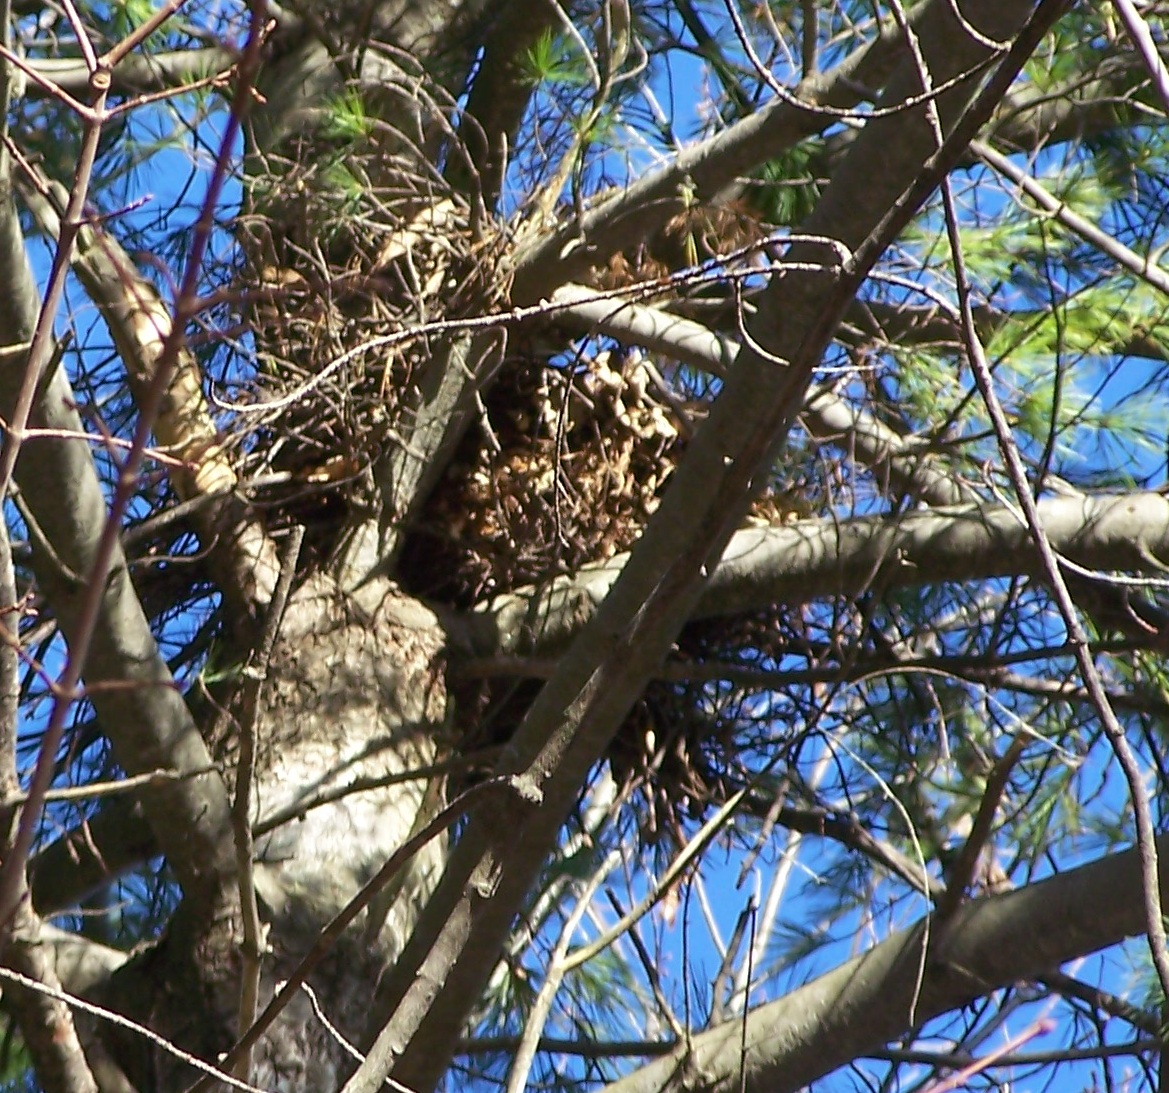
Squirrel nest made of leaves, twigs, and pine needles
Phot by Brad Sylvester, copyright 2011. Do not copy.
Squirrels build nests out of leaves, pine needles, and twigs in the crook of the branches of a tree, generally quite high above the ground. The squirrel nest in the photo to the left was located about 40 feet up in my yard. These types of gray squirrel nests are fairly large, often measuring 18 inches or more in diameter. They are usually easily visible in the fall and winter after the leaves have fallen from deciduous trees or coniferous trees have shed some of their needle mass for the winter.

On the other hand, though, gray squirrels will also nest inside tree cavities that either occur naturally or were carved out by birds like woodpeckers. These can be much more difficult if not impossible to spot from the ground. When these kinds of nests are used, they'll alos be lined with soft materials like leaves and pine needles, presumably for comfort as well as insulation.

During rain, snow or very cold weather, squirrels will curl up in their nests for protection from the elements.

Gray squirrel babies are born in mid-summer and are blind and hairless like baby rats. They'll be cared for by their mothers in the nest that both parents helped to build until they are old enough to find or build their own places.

Quick Facts about the Gray Squirrel (Sciurus carolinensis):

Lifespan: The Adirondack Ecological Center puts the average lifespan of a gray squirrel at 1-2 years, but if they make it to adulthood, six years is more typical. The reords, says the AEC, is 12 years in the wild and 20 years in captivity.

Lifecycle: Baby Gray squirrels are born in the summer, usually in small litters of 2-3 babies after a gestation period of about 6 weeks, plus or minus a couple of days. They may stay in the nest for as little as 56 days or until the follwoing spring, depending upon when in the summer they were born. They'll be ready to start their own families in the summer following the one in which they were born.

When is it here? Gray squirrels live in New Hampshire all year round.

Where does the Gray Squirrel go in the winter? Gray squirrels are active all winter long, but will hide in their nests during periods severe weather or extreme cold. They survive on hidden foods stores buried during the bountiful summer. They'll even burrow under the snow to find buried caches of food.

Are gray squirrels dangerous? While it is theoretically possibel for a squirrel to catch and transmit rabies, this is rare to the extreme and, according to eMedTV.com, there are no recorded cases of a human catching rabies from a squirrel bite. However, they should still be treated as wild animals that will inflict a painful bite subject to infection.

Notes: Gray Squirrels belong to the order of Rodentia (Rodents) characterized by their large front incisors which have a chisel shape for efficient gnawing. Sometimes squirrels will gnaw their way into a house and set up residence inside the wood-framed walls or in the attic.


Friday, August 12, 2011

Mystery solved (Janetiella brevicauda) Grape Tumid Gallmaker

Kim Phillips a member of an entomology group to which I belong on Facebook suggested Grape Tomato Gall minutes after I posted the story of a mystery bug this morning. It seemed a good possibility, but I couldn't confirm it, because internet sources seem conflicted about just what Grape Tomato Gall actually is. Bugguide.net could provide no help at all. The source I orginially checked, Ohio State University, for example, believes it is caused by several species of midges saying that the most common is Lasioptera vitis or a species of the genus Cecidomyia. 

While these seemed close in some respects in others they differed. I went away from it for a while, and then thought some more. Cornell University attributes Grape Tomato Gall to a different species, and remarks that although it used to be thought to be caused as many as five different species, it is now recognized as only Janetiella brevicauda that causes this particular gall and it infects only grapes. Cornell correctly identifies the larva as limbless and orange, as opposed to Ohio State's "pinkish in color."

Scars caused by the entry of Grape Tumid
Gallmaker Larvae (Janetiella brevicauda)
Photo by Brad Sylvester, copyright 2011. Do not copy.
Cornell also mentions that the galls will have a very tiny white scar where the insect burrowed into the shoot or tendril. As it happens, I did notice such scars and even photographed them, though I did not include them with the original post. We've got a match! The mystery creature is certainly Janetiella brevicauda, although a very young one as they can grow from microscopic eggs to 3mm in length while in the gall they create.

Furthermore, Grape Tomato Gall is now more commonly called Grape Tumid Gall so people understand clearly that it affects the grape as a host and not the tomato. Tumid means swollen. The insect is referred to as the Grape Tumid Gallmaker.

Quick facts about Grape Tumid Gallmaker (Janetiella brevicauda):
Range: Northeast United States and Eastern Canada
When is it here: All year round. (see Life Cycle).
Lifespan: From a few months to a little less than one year, depending upon the hatch date of the eggs.
Life Cycle: Adults lay about 200 orange eggs in a mass near young grape shoots. The eggs hatch throughout the summer and the larvae burrow into grape shoots, tendrils or leaves. The gall swells around them and they proceed through several instars before exiting the gall and dropping to the ground to pupate in the soil. If it is still early summer, they'll pupate right away and metamorphosize into adult midges which lay a news set of eggs and die. The adults live only a few days.If it is later in the summer, the larvae will overwinter in the ground and pupate in the spring (early June).
Notes: The Grape Tomato Gallmaker is generally not present in sufficient numbers to cause significant harm to vineyards or individual grape vines. Cornell suggests that if they do become a problem, all that need be done is mound up the soil around the grape before they pupate in the spring and they'll be unable to burrow out; problem solved.


Thursday, August 4, 2011

Pit trap success - Common Black Ground Beetle -Pterostichus Genus

Beetle in insect pit trap
Photo by Brad Sylvester
copyright 2011, all rights reserved
On the first morning (August 4, 2011) after installing several very small pit traps in the forest floor in my backyard, I have met with success and captured a bug, a beetle to be more precise. It fell into the trap and appears unable to gain purchase on the smooth walls to crawl out.

The benefit of using these straight walled containers as opposed to undercut glass jars is that I can lift them straight up out of the hole without disturbing the hole. Then I can cap it, place a replacement container in the existing hole, and return to a more convenient observation area to figure out just what it is that I've caught.

Straight-walled pit trap containers slide in and out of
the hole easily for emptying and replacement.
Photo by Brad Sylvester, copyright 2011, all rights reserved
This specimen is clearly of the Order Beetles or Coleoptera. How do I know they are beetles? Well, once again, I'm going to say there are exceptions to the rule, but most beetles have a specialized set of wings that act as wing-covers to protect the wings they use to fly when not in use. The wing covers are generally hard and chitinous and when folded back in non-flying position, they completely cover the softer hind wings. The wing-covers or specialized fore-wings usually form a very straight line right down the middle of the beetle's back where they meet. The exception to the rule is a few species that have only vestigial traces of wings left and these might be a little harder to identify as Coleoptera right off the bat.

Also, I didn't know this, but bugguide.net assures me that Coleoptera or beetles, for the most part, have exactly 11 segments in each antenna. Some of my photos of this specimen are just barely clear enough to make out that there are indeed exactly 11 antenna segments present.

So then, we have all manner of sub-orders to choose from: Scarab beetles, water scavenger beetles, whirligig beetles, ground beetles... Wait a second, This beetle was captured on the ground among leaf litter, let start with ground beetles and see if we can find a match. Almost instantly we find the Common Balck Ground Beetle photo in the Audubon insect field guide. This is an approximate identification as there are many species that fall into this genus (Pterostichus). 180 species of Pterostichus have been identified in North America according to bugguide.net.

As is my usual motus operandi, I photographed this insect from a variety of angles and then let it go. Planning to do the identification from photos alone. In this case, my photos just aren't clear enough in the areas they need to be to make a positive identification of the exact species. There are many that can be ruled out, but the best we can do is drop this one into the Pterostichus genus and leave the species unresolved.

Common Black Ground Beetle (Genus: Pterostichus)
Photo by Brad Sylvester, copyright 2011, all rights reserved

I can also learn to keep the specimen until I make sure I have covered the identifying field marks either visually or in well-detailed photos.

Quick Facts about the Common Black Ground Beetle:
Diet: soft-bodied insects
Range: depends on the species, but Pterostichus can be found throughout North America
Habitat: varies a bit by specific species, but many are found in deciduous forest leaf litter and under rocks and logs. A few species can be found in planted fields (where anything that eats caterpillars is generally considered beneficial...)
Lifecycle: Common Black Ground Beetles lay eggs shallowly in the ground during the summer. They hatch into larvae in the same year and the larva hunkers down to wait out the winter when it gets cold. They will pupate and metamophosize into the adult beetle form from July to August depending upon region and species.
Lifespan: No information found, but there is also no mention of the adult beetle successfully overwintering (in New England) so it's likely these live from about July to at least the first hard freeze in November of the following year or roughly 15-16 months.
Activity: Bugguide.net says they are active in the daytime and thus are diurnal. This specimen fell into the trap between dusk and 9:00 am (which certainly allows daylight enough for them to be diurnal).

Wednesday, August 3, 2011

How to make a small pit trap for insects

This is all the equipment I'll need to install small
pit traps to catch insects.
Photo by Brad Sylvester, copyright 2011, all rights reserved
It's easy to go outside and find a new bug or bird for this blgo at this point, but there are huge numbers of creatures that simply can't be spotted that way. One such group is the nocturnal creatures. Those that come out only at night, under the cover of darkness.

To find these creatures, I could go out at night and look for them. In the dark, I'd have pretty poor luck because my aeyes have not evolved to give me good night vision. While I might find some things if I knew exactly where to look for them, there woudl still be many more that I would miss.

To try to get a good look at some of these, I'm going to use various types of traps. Traps are placed where the creatures, in this case bugs, might be expected to travel during the night. The trap's purpose is to collect and hold the bugs until I can come and see them first thing in the morning. Bug traps can be very imple to very complex. Over time, I'll use many different kinds and I'll explain each one.

Today, I installed a simple pit trap for insects. Pit traps are generally non-specific. that means they don't attract a single species with the use of special bait or some other lure that won't pull in any non-target species. Pit traps catch whatever happens to come along and fall in. For a very small ground pit trap, like the one I'm using today, that will mostly mean insect, but it's possible that it could catch a small mouse, toad, frog, or even a small lizard. Whether it could hold each of them would depend on the animal's size.

For my traps I'm using small plastic containers that are about six inches deep, have smooth vertical walls, and an oval shaped opening that measures roughly one inch by two inches. Glass jars also work grea, especially if they have an undercut shape so that anything trying to crawl out from inside not only has to scale vertical surfaces, but has to actually crawl upside down to escape. I'm hoping the very smooth, low friction sides of these plastic containers, combined with the narrow cross section will keep most bugs inside.

The installed insect pit trap
Photo by Brad Sylvester, copyright 2011, all rights reserved
To install the trap, I simple dig a hole and place the container inside so that the lip of the container is flush with the surface of the ground. I replace any ground cover that was there around the outside of the hole so that it seems just like any other area of the forest floor. I do not cover the hole.


I'll place several of these around the same area. Because they are small, they don't cover mcuh territory and adding several helps increase the odds that they will fall in the path of something during the night. Of course, they work all day long as well, diurnal creatures can fall in just as easily as nocturnal creatures so checking both in the mornign and at dusk helps me figure out what I've caught by determining when it was active and fell in.

You should check the weather when using pit traps. They can fill with rainwater and drown water is inside if the weather is bad. Not only is it unnecessary to kill the bugs, but draowning and waterbloating can sometimes make them more difficult to identify as it can distort the size and shape of the body. If the forecast calls for rain, cover your pit traps to keep water out of them.

Another hazard of these kinds of traps is that even after one bug is caught more can fall in. If you get bugs with an adversarial relationship, you might be left with pieces of dead bugs or only the survivor of the night's encounters - another undesired outcome, but one that's more difficult to prevent.

I use deep, narrow containers because it makes it more difficult for winged creatures to escape. many of them don't fly vertically or at a steep climbing rate, so they bump into the wall and fall back down before they gain enough height to escape. The same principle applies to jumpers.

I installed these traps today, August 3rd in a wooded section of the yard as you can see from the photo below. It's a very small clearing that has a number of ground plants in addition to leaf litter. The ground around the trap is dry and solid, though moist as you'd expect from a leaf-covered forest floor. If I were putting out many traps throughout the woods, I'd number each one and record the type of habitat in which it was placed. Weather condition, temperatures, the type of vegetation near the trap, and time of year would all be variables that might cause each trap to catch different species of insects - or nothing at all.

I'm planning to leave these traps out for an extended period of time checking twice a day to see what we get. Choose one of the "follow" options from the side panel to learn what I catch.

Tuesday, July 19, 2011

Northern Green Frogs (Rana clamitans melatona), Frog Traps and Frog Legs

Norther Green Frog (Rana clamitans melatona)
Photo by Brad Sylvester, copyright 2011, all rights reserved
Today’s new species for What Lives in my Yard is the Northern Green Frog (Rana clamitans melanota), not to be confused with the green tree frog. The Northern Green Frog is the first of the taxonomy Class Amphibia or Amphibians to be recorded in this blog (although I am fairly certain, not the last).
My Frog Trap
 In a sense, you can say that I discovered these frogs in my yard by setting a trap. Not the usual kind of trap, but an effective one nevertheless. I put a small man-made pond in my backyard two years ago. It has a stone waterfall, some plants to provide shade, and a 100 gallon or so reservoir/ pond. When the streams dry up each year, usually in July, it is the only permanent pool of water on my property, discounting a mud hole or two at the far end of the forest.
In July, therefore, this little pond becomes a very attractive bit of real estate for animal species that need water, like frogs, for example. The water is the bait and the lack of water elsewhere is the barrier that keeps the frogs there once they take the bait, especially when dryer summer weather arrives, limiting their opportunity to move again. There are also a number of insects that take up residence or breed in the pond as well. At present, it contains hoards of what appear to be daphnia, but until I get a USB capable microscope running, they’ll have to wait.
The Wanderlust of Young Green Frogs
 It is ordinary for juvenile green frogs (less than two years old) to travel when it rains or is wet enough for them to be comfortable away from their home pond. If they find another body of water, they may take up residence there. If they stayed in one spot, the survival rate would probably be higher (since they are less vulnerable to foxes and other land predators which are numerous in New England), but the home pond would become a bit crowded as the males tried to defend their breeding territories against the maturing juveniles. Since they get bigger each year for four or five years, the juveniles would get pushed out anyway, so their natural wanderlust serves them well.  
Meanwhile, there are three Northern Green Frogs living in the pond all of a smaller size consistent with them being juveniles. I toyed with the idea of netting one and getting some better photos, but you can see all the identifying features in the photos I already took, so there was no need to disturb them further.

Click the image for a slide show of my Northern Green Frog images

Identifying Features of Northern Green Frogs
The first and most obvious identifying feature for a Northern Green Frog is the pair of defined ridges on its back. You can see them in the photo at the top left of this post. They run from the ear circles down to its rump. The underside of the green frog is white with dark irregular spots, especially at the intersection of the white and green or brown - as is also visible in the photo. It has a prominent lighter green area above its mouth and may have a bit of the white coloring from its underside also showing just above the mouth. Overall coloration can range from quite green to a muddy brown. There’s a southern variant called the bronze frog because of its color which is classified as Rana clamitans clamitans.
Tadpoles of the green frog tend to have yellowish undersides.
Frog Limb Deformities
Green frogs are one of the species that have been reported in recent years with limb deformities which, as memory serves, have been attributed to chemical contamination and also parasitic infection, perhaps facilitate by a chemically-compromised immune system, although it has been years since I read that in a newspaper, so I can’t say for certain that I’m recalling it accurately, so I should check to be sure. Wait here a minute, I’ll be right back… Yes, there it is at the National Institute of Environmental Health Sciences from a 2002 Penn State study: Limb deformities caused by physical intrusion of Trematode parasites facilitated by depressed immune systems caused by agricultural run-off.
 The three frogs I have in my pond have none of that. Although the valley below the mountain could have significant agricultural run-off, any frogs that can travel far enough to reach my pond most like don’t have extra legs slowing them down, so it’s certainly a non-random, self-selecting healthy sample.
Frog Legs and Essence of Frog
Well, I have to say that I have never caught frogs for food, but green frogs, especially the full-sized ones of 4-5 years old or more, are a suitable species from which frog legs may be harvested to be cooked and eaten, although bull frogs are more commonly used for this purpose in the United States. At any rate, for those so inclined, froglegs.org has a list of recipes that is lengthier than I would have imagined. I  do have to confess, however, that I have tried fried frog legs at Les Chefs de France, a restaurant in the French Pavilion at Disney’s Epcot Center, and I had a dessert dish that was described to me as “Essence of Frog” with a very light maple syrup while in southern China, which I was told, “would improve my virility.” Both were quite good.
Quick facts about the Northern Green Frog (Rana clamitans melanota)
Lifespan: In captivity, according to the University of Michigan, green frogs can live for about 10 years. That’s much longer than I would have guessed, although I knew some species of frogs, including the green frog, may remain tadpoles for more than a full year.
Lifecycle: Green frogs reach sexual maturity at two years old. They lay as many as 7000 eggs in an annual clutch, with an occasional second clutch of up to 1500 more eggs. With egg masses of that size and a 10 year lifespan, it’s obvious that a very small percentage of those eggs will survive to adulthood or we’d really have a plague of frogs.
Eggs hatch into tadpoles in 3-7 days. From there, development may take one of two paths. Either the tadpoles will undergo metamorphosis in about three months becoming frogs before the winter, or they will overwinter as tadpoles, hibernating in the mud until the following spring. These individuals may take as long as 22 months to metamorphosize into juvenile frogs. Once they do, however, they reach sexual maturity at the same overall age as the early metamorphs, at two years old.
Habitat: fresh-water wetlands, ponds, and lakes
Diet:  Adults: Mostly insects and some other small animals opportunistically. Tadpoles: diatoms, algae, zooplankton.
When the northern green frog is here:  All year round.
Range: From Texas to Florida in the south and up through Central Canada along that same east to west stretch.
IUCN Redlist status:  Least Concern

Tuesday, July 12, 2011

How to tell a moth from a butterfly

Some people just don't like bugs. Even those people, however, often have a favorable view of butterflies. The colorful patterns of their wings make them like little abstract paintings on the wing, a mobile art gallery in the garden, as it were. In my yard, fortunately, there are a number of different butterflies and colorful moths.

The first step to identifying one of these insects, is to determine whether it is a butterfly or a moth. A good close-up view of the antenna can usually put this question to rest. Although there are some exceptions to the rule, the antennae of butterflies are structurally different than those of most moths.

The antenna of a moth, upon close inspection, is feathery in structure with a main "stem" and smaller little "branches" all along its length. The two photos below show the difference. Note that the butterfly antenna as shown in the top photo almost always has a thickening at the end, almost like a club.

Antenna of the Eyed Brown Butterfly with club-like end
Photo by Brad Sylvester, copyright 2011, all rights reserved
Antenna of the Polyphemus moth showing feathery branches
Photo by Brad Sylvester, copyright 2011, all rights reserved

Another way to tell the difference between a moth and a butterfly is the cocoon or chrysalis. Most all moths spin a thread cocoon. This cocoon will usually be on the ground or attached firmly to a solid object such as the underside of the eaves of your house. Butterflies, on the other hand, tend to form a chrysalis which has smooth walls and is usually hanging in the air from a branch. Of course, by the time you see it flying around, it's too late for this test.

Generally. moths are active at night, but are occasionally seen moving about during daylight hours (at least they are in my yard). Butterflies are active during the daytime. This helps, but is really not reliable enough of a clue to make the determination between moth and butterfly on its own.

Another clue is the way the insect holds its wings when at rest. Butterflies wings stay extended and may be upright and together, sticking straight out to the sides or slowly moving back and forth between the two positions. Some of the larger moths do this too, but many moths at rest have swept-back wings that fold back along their body.

Moths and butterflies have two sets of wings, the forewings and the hindwings. To fly effectively, the forewing and the hindwing need to be held together. In many moths, there's a kind of tiny row of hook-like structures on the hindwing that catch and hold bristles from the forewing. In butterflies, however, usually just have a lobe of the hindwing that overlaps the forewing. However, it can be very hard to see this unless you are handling the butterfly or moth which risks damaging them.

Another clue, but not a sure thing, is the color of the wings. Moths tend to be nocturnal and hide during the daytime, so most often, their wings are a drab brown, gray, white, or other color that allows them to more easily blend into their surroundings. Butterflies, on the other hand, tend to be bright and visually distinctive, using their coloration and intricate patterns to self-identify their species to prospective mates. Their wing patterns may also serve to deter potential predators, sometimes exhibiting large false eye spots that make their wings look a bit like a large predatory face.

Butterflies often, but not always, have long slender bodies, while many moths have short, more bulbous bodies. Again, though, this is not always a reliable indicator.

Although each individual clue may be less than 100% reliable, when you start stacking them together and all of them point to either moth or butterfly, then their value increases. The antenna difference is the easiest and most reliable differentiator between a moth and a butterfly, although, as I mentioned there are some exceptions to the rule.

Once you have it narrowed down to moth or butterfly, you at least know where to start looking for a specific species identification

Tuesday, July 5, 2011

How Many Animals Live in my Yard?

I've always wondered what animals share my yard. Our yard is 5.25 acres on a mountainside in southern New Hampshire. About four of those acres are wooded and two small brooks run through it. One small corner is a bit boggy year-round. In short, there are a variety of habitats on our property that must be home to many, many different animals.

Including insects, I'd bet there are something like 1000 different species of animals that live on our property for all or part of the year. This blog will detail my efforts to discover all of them!

Methods for Finding and Identifying Animals

When possible, I'll include photos of each species that I find. I'll be using a variety of methods to uncover my secret animal neighbors including an automatic trail camera that takes digital photos when a motion detector is activated (even in pitch black conditions), pit traps (for bugs), a microscope for the teeny tiny critters, a live trap for small vermin, and a variety of different equipment and methods for finding and identifying every living creature that shares my little neck of the woods.

It should be quite an adventure. In the past, we have had everything from a ruffed grouse to a black bear. In the area where we live there are coyotes, foxes, bobcats, moose, fisher cats, weasels, deer, a couple hundred bird species, and more bugs than I can shake a stick at.

We get very cold and snowy winters, which, of course, will reduce the amount of wildlife that we can find during those coldest months, but using the evidence they leave in the snow, we should be able to add some to our list even then.

So, although I know quite a few of the animals that live here already, I'll start the tally from scratch and only add them to the master list as I spot them (or find irrefutable evidence). I'll make regular entries for new finds, with some basic information about them and a photo or two if possible.

I'll also detail the methods I use to discover what animals live on our property and the times of year when they were found. I'll scout the area for food sources for various animals to see if they might find our yard to be a good habitat. I'll be using eyes, ears, electronics, and everything else I can think of to find the animals, and then field guides, the internet, local experts, and even readers' help to identify what I find.

How Many Species will I Find?

My rough guess is that when all is said and done, I'll be able to record 1000 species here. That's a flat out guess. I have no idea how many species of insects live in New Hampshire. I do know that there are about 240-250 species of birds that reside in the state at least part-time, although many are water birds or live in habitats not present in our yard.

There's also the distinction between wild and domestic animals. On the domestic side, we have chickens, 2 dogs, a cat, and will probably add a couple of koi in a small pond in the backyard at some point this summer. So without counting the fish, that's four (including the three human beings) that live on our property right off the bat.

Come along for the adventure and never miss a new discovery by following our the What Lives in my Yard? blog.

By the way, for our definitions, if an animal is found on the property, we'll count it as living here even though many of them may be just passing through (like black bears, for example).